
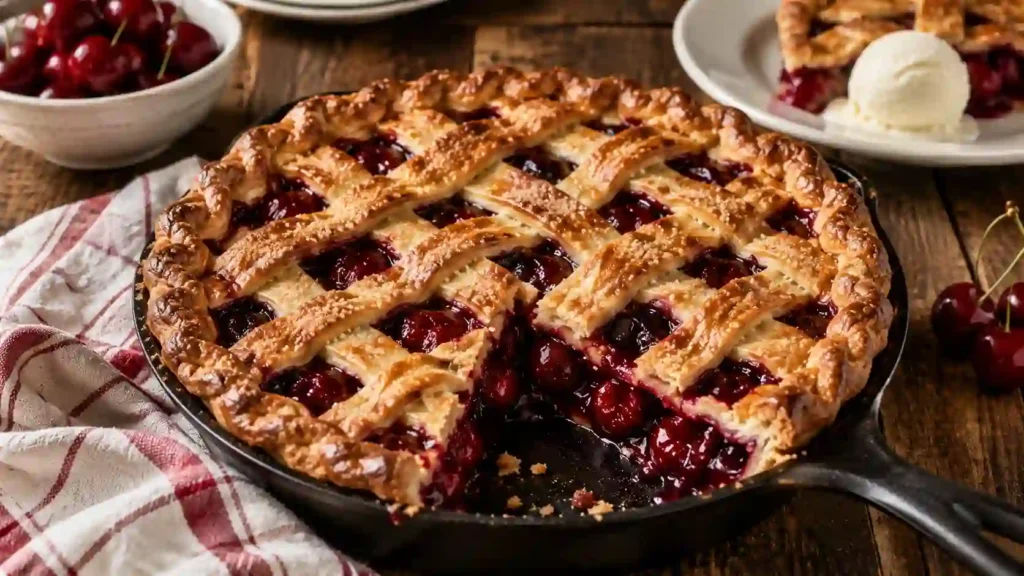
Nothing says comfort quite like a Homemade Cherry Pie fresh from the oven. With a buttery, flaky crust and a juicy cherry filling bursting with sweet-tart flavor, this classic dessert is perfect for holidays, family gatherings, or simply enjoying a slice with a scoop of vanilla ice cream. This easy homemade recipe delivers bakery-quality results using simple ingredients and fresh cherries.
Why You’ll Love This Recipe
- Flaky, buttery homemade pie crust
- Juicy cherry filling made with fresh sweet cherries
- Perfect balance of sweet and tart flavors
- Ideal for holidays, summer gatherings, and celebrations
- Beautiful lattice crust for a classic bakery look
- Easy to prepare ahead of time
- Delicious served warm or chilled
Ingredients
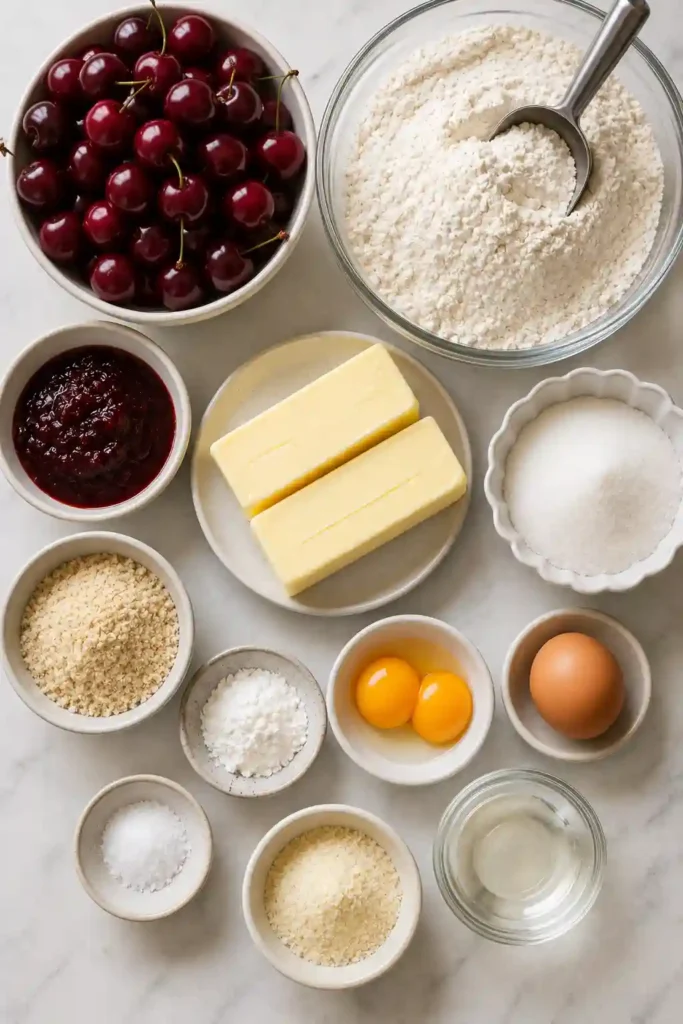
Pie Crust
- 3⅓ cups all-purpose flour
- ⅓ cup finely ground almond flour
- 2 tablespoons ground almond flour (for the base)
- 2 sticks cold unsalted butter, cubed
- ⅓ cup granulated sugar
- 2 egg yolks
- 2 tablespoons cold water
- ¼ teaspoon salt
Cherry Filling
- 2 pounds sweet cherries, pitted
- ½ cup cherry jam
- ¼ cup granulated sugar
- 2½ tablespoons cornstarch
Finishing
- 1 egg white, beaten
- Extra granulated sugar for sprinkling
Instructions
- In a food processor, combine the all-purpose flour, almond flour, butter, sugar, and salt until the mixture resembles coarse crumbs.
- Whisk together the egg yolks and cold water, then add to the processor. Pulse until the dough begins to come together.
- Divide the dough into two discs, wrap tightly, and refrigerate for at least 30 minutes.
- In a large bowl, mix the cherries, cherry jam, sugar, and cornstarch until evenly coated.
- Preheat the oven to 400°F (200°C).
- Roll out one disc of dough on a lightly floured surface and line a 9–10-inch pie dish.
- Sprinkle the reserved almond flour over the bottom of the crust.
- Spoon the cherry filling evenly into the crust.
- Roll out the second dough disc and either cover the pie completely or create a lattice top.
- Brush the edges with egg white, seal and crimp the crust, then brush the entire top with more egg white.
- Sprinkle lightly with granulated sugar.
- Bake the Homemade Cherry Pie for 55–60 minutes until the crust is golden brown and the filling is bubbling. If the edges brown too quickly, cover them loosely with foil.
- Allow the pie to cool for at least one hour before slicing to let the filling set.
- Serve warm with vanilla ice cream or whipped cream.

Tips & Tricks
- Use fresh, ripe cherries for the best flavor.
- Chill the pie dough before rolling to ensure a flaky crust.
- Almond flour helps prevent a soggy bottom crust.
- Don’t skip the cooling time—the filling thickens as it cools.
- Add a pinch of cinnamon or almond extract for extra flavor.
- Freeze the butter before making the crust for an even flakier texture.
Details
- Prep Time: 35 minutes
- Chill Time: 30 minutes
- Cook Time: 60 minutes
- Total Time: 2 hours 5 minutes
- Yield: 8 servings
- Category: Dessert
- Method: Baking
- Cuisine: American
- Difficulty: Intermediate
- Dietary Notes: Vegetarian

Notes
- Frozen cherries can be used; thaw and drain them well first.
- Cherry preserves can replace cherry jam.
- Add a little lemon zest to brighten the filling.
- Decorative pastry cutouts create a beautiful presentation.
- Store leftovers loosely covered to maintain a crisp crust.
Nutrition (Approximate Per Serving)
- Calories: 485
- Protein: 6g
- Carbohydrates: 58g
- Fat: 25g
- Saturated Fat: 14g
- Fiber: 4g
- Sugar: 27g
- Sodium: 135mg
FAQ
Can I use frozen cherries?
Yes. Thaw completely and drain off excess liquid before making the filling.
How do I keep the bottom crust from getting soggy?
Sprinkling almond flour over the crust helps absorb extra juices before baking.
Can I make Homemade Cherry Pie ahead of time?
Absolutely. Bake the pie a day ahead and store it at room temperature or refrigerate until serving.
Should cherry pie be refrigerated?
Yes, after it has cooled completely. Store covered in the refrigerator if keeping it for more than one day.
What can I serve with cherry pie?
Vanilla ice cream, whipped cream, crème fraîche, or lightly sweetened whipped mascarpone all pair beautifully.
Storage
- Room Temperature: Up to 24 hours, loosely covered.
- Refrigerator: Store for up to 4 days in an airtight container or covered pie dish.
- Freezer: Freeze baked pie for up to 3 months. Thaw overnight and warm before serving.
- Reheating: Warm slices in a 325°F oven for 10–15 minutes to refresh the crust.

Similar Recipes
Homemade Cherry Pie Recipe
Ingredients
Pie Crust
- 3⅓ cups all-purpose flour
- ⅓ cup finely ground almond flour
- 2 tablespoons ground almond flour for the base
- 2 sticks cold unsalted butter cubed
- ⅓ cup granulated sugar
- 2 egg yolks
- 2 tablespoons cold water
- ¼ teaspoon salt
Cherry Filling
- 2 pounds sweet cherries pitted
- ½ cup cherry jam
- ¼ cup granulated sugar
- 2½ tablespoons cornstarch
Finishing
- 1 egg white beaten
- Extra granulated sugar for sprinkling
Instructions
- In a food processor, combine the all-purpose flour, almond flour, butter, sugar, and salt until the mixture resembles coarse crumbs.
- Whisk together the egg yolks and cold water, then add to the processor. Pulse until the dough begins to come together.
- Divide the dough into two discs, wrap tightly, and refrigerate for at least 30 minutes.
- In a large bowl, mix the cherries, cherry jam, sugar, and cornstarch until evenly coated.
- Preheat the oven to 400°F (200°C).
- Roll out one disc of dough on a lightly floured surface and line a 9–10-inch pie dish.
- Sprinkle the reserved almond flour over the bottom of the crust.
- Spoon the cherry filling evenly into the crust.
- Roll out the second dough disc and either cover the pie completely or create a lattice top.
- Brush the edges with egg white, seal and crimp the crust, then brush the entire top with more egg white.
- Sprinkle lightly with granulated sugar.
- Bake the Homemade Cherry Pie for 55–60 minutes until the crust is golden brown and the filling is bubbling. If the edges brown too quickly, cover them loosely with foil.
- Allow the pie to cool for at least one hour before slicing to let the filling set.
- Serve warm with vanilla ice cream or whipped cream.
Notes
- Frozen cherries can be used; thaw and drain them well first.
- Cherry preserves can replace cherry jam.
- Add a little lemon zest to brighten the filling.
- Decorative pastry cutouts create a beautiful presentation.
- Store leftovers loosely covered to maintain a crisp crust
Conclusion
This Homemade Cherry Pie is everything a classic pie should be—golden, flaky, buttery, and filled with juicy cherries in every slice. Whether you’re baking for a holiday celebration, a summer picnic, or simply satisfying a homemade dessert craving, this timeless recipe is sure to impress. Serve it warm with a scoop of vanilla ice cream for an unforgettable treat